Tuesday, November 29, 2011

Sonar Devices


Historically, ice anglers depended on clip-on lead weights to determine depth. By drilling hole after hole, anglers could drop these weights to bottom, repeatedly measure depths and eventually locate drop-offs and other underwater structures. Those with a sensitive touch could even differentiate hard bottom from soft bottom. But this was a time-consuming, often difficult task.

Today, modern sonar makes the same process relatively easy. These sensitive electronic devices feature transmitter/receivers called transducers that transmit sound waves to the bottom, receive these echos back after they bounce off bottom and return, then display these signals on a dial or screen. Once ice anglers learn to understand these displays they can easily determine depth, and by simply moving through an area and noting the depth at various points, piece together the precise location of drop-offs, underwater points, humps, holes, weeds, timber, rocks, plankton, baitfish, gamefish and differentiate bottom hardness.

The sonar available to the modern ice angler is nothing short of amazing. In fact, many anglers don't even drill holes through the ice unless they first spot gamefish with their sonar. How is that possible? By simply pouring water on solid, clear ice and placing the transducer in the water, the unit can transmit and receive sound waves through the ice, allowing you to see the depth, weeds and even fish.

Sonar Types

Sonar comes in a variety of types, but traditional flashers, liquid crystal flashers, liquid crystal graphs (LCG's) and some hand-held specialty models are the primary tools of modern ice anglers.

Traditional flashers, such as the Vexilar(r) FL-8SLT and Zercom(r) ColorPoint, show the sonar signal on a calibrated dial, which reveals depth, bottom content, cover, fish, even your lure or bait. Uniquely, flashers provide a simultaneous reaction display. In other words, if you move your lure, you see its motion displayed on the screen at the same time, providing a distinct advantage for ice anglers who want to see when fish are moving in and how they're reacting to precise presentations. Traditional flashers do, however, require a great deal of battery "juice" to power a motor and bulb, making it necessary to recharge batteries after a few days of hard use.

Liquid crystal flashers. Like traditional flashers, liquid crystal flashers display the sonar signal on a calibrated dial display and, due to some spectacular engineering feats, provide simultaneous reaction display. Some models, like the Zercom LCF-40 Ice, are custom-designed for ice fishing and feature special grade freeze-resistant display fluids. Liquid crystal flashers use much less battery juice than traditional flashers, extending battery life.

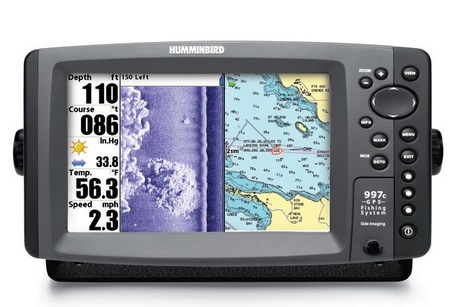
Liquid crystal graphs. LCG's display the sonar signal on a televisionlike screen made up of varying numbers of squares, called pixels, which reveal depth, bottom content, cover, fish and your lure or bait. The larger the number of pixels, the more defined the resulting picture. While close, response time is not simultaneous as it is with traditional flashers-a disadvantage when immediate response times are desired. Liquid crystal graphs also feature liquid filled screens, making them subject to freeze up if a cold-weather grade liquid is not used.

Specialty sonar: Gun-or hand-held units, such as the StrikeMaster Polar Vision, are a convenient way of determining depth and the presence of fish, but aren't as useful for providing information regarding bottom hardness and presence of cover.

Important Sonar Features

Once you've chosen the sonar style that best meets your ice-fishing needs, you'll want to consider several important features when selecting a specific unit, including portability, depth capability, transducer style and angle, power, frequency, target separation and display resolution.

Portability is crucial, because you'll need to easily carry the unit from hole to hole to locate and catch active fish. Most sonar devices marketed for the ice fisherman include either a durable plastic case or zippered carrying case.

Depth capability is the unit's ability to display signals from shallow or deep water. Most units feature several ranges, such as 0-30, 0-60, 0-120 and 0-240, and a number of modern LCG units even allow you to program the specific depth range being covered, allowing you to "zoom" in on a specific range or feature you want to view in greater detail.

Flasher colour is a flasher readout dial presented in color. The Vexilar FL-8SLT, for example, shows the strongest signals in bright red, light signals in green, and modest signals in orange, making it a very user-friendly flasher.

A transducer is the sonar device's transmitter and receiver. The primary consideration here is the unit's cone angle, which determines how large of a cone-shaped area the sonar sound waves cover. A narrow cone angle concentrates the signal strength into a small area, making it best for detecting fish holding in deep water or tight to bottom. A wide cone angle spreads the signal throughout a larger area, making it weaker, but good for covering more water, detecting suspended fish or locating fish in shallow water. Some units may feature a dual or three-way transducer, which allows you to interchange between two or more cone angles.

A self-aligning transducer is a big advantage to ice anglers, simply because the transducer is suspended in the water, causing it to automatically level itself and provide optimum readings.

Sonar power is measured in watts and determines the strength behind the sound waves being distributed to the bottom.

The more power a unit has, the more potential it has for obtaining detailed readings, including small targets in deep water. Most units run 400 to 1000 watts of power.

Frequency is measured in kilohertz (kHz) and simply determines the pattern of the sound waves being distributed and received by the transducer. Most units feature 200 kHz. The advantage of using a different frequency is simply that interference from other units is decreased or eliminated.

Target separation is the distance a transducer receiver and display screen or dial can separate targets appearing within the sonar cone. The smaller the target separation, the more clear your readings will be.

Display resolution is the ability of a calibrated dial to display the details of a signal being provided by the transducer. A liquid crystal graph with a powerful transducer and low pixel count, for example, may pick up detailed signals but not be able to fully display them.

How to Use Sonar

Often, the biggest difference between the catch of an ice-fishing expert and everyday angler is the expert's knowledgeable use of sonar. By learning how to properly read what the unit is revealing and taking advantage of that knowledge, experts vastly improve their understanding of the under-ice environment and how fish are reacting to it, then make the adjustments necessary to increase their winter catches.

To set up a flasher-type sonar for ice fishing, be sure the power button is in the "off" position, then connect your power and transducer cords to the unit, and hook up the battery. Next, set your transducer level in the hole, turn on the unit, and lower your lure about 5 feet down. Increase the gain until you clearly see the bottom and just make out your jig. Fish will now show up as they move through the sonar signal. Note that as you lower your jig deeper, you may need to turn up the gain with some units to ensure good readings.

As you spend time viewing your flasher screen, look for the following signals:

Depth appears as a solid band. On the Vexilar FL-8SLT shown below, the depth is 14 feet. Rock, gravel or sand bottoms are indicated by a second mark (double echo) at exactly twice the real depth; soft bottoms, by a wide, dim band, with no second mark.

A lure appears as a distinct, solid mark suspended at the depth you've lowered it. The gain on a Vexilar should be adjusted so the lure shows as a green or green/orange mark.

Baitfish and Plankton appear as thin marks unconnected to bottom. The Vexilar shows baitfish as thin, green marks. Because baitfish are often moving quickly, their flasher signal quivers and moves accordingly.

Weeds and other cover appear as irregular, thin, stationary marks projecting off bottom. On the Vexilar, weeds show up as thin, green marks.

Fish appear as distinct, strong, solid marks either suspended or holding just off bottom. The Vexilar indicates a fish located directly below the hole as a bright red mark.

Battery Basics

Most ice anglers have declared gel-cell batteries the winter sonar battery of choice. They're relatively lightweight, won't leak acid and can be drained and recharged numerous times without needing replacing. For best results, bring your battery inside after each use, and once the battery reaches room temperature, charge overnight to maintain the battery at peak charge. Batteries should also be charged periodically during long-term storage


Article source: gandermountain.com


Grab The Bookmarketer For Your Site

Tuesday, November 22, 2011

Glow in the Dark Fishing Lure Reviews


Although our largest group of high volume purchasers are tackle manufacturers, our experts at Glow Inc. are not avid fisherman. In fact, most of them would run at the sight of a worm.

But our bait-loving customers report great success with glow in the dark fishing lures. To our surprise, they even claim that the fish prefer the glow lures during the day.

Fish tale?...Possibly.

Quick Glow in the Dark Fishing Tackle

Although we supply pigment to many lure manufacturers, you do not need to buy off-the-shelf glow in the dark tackle. We suggest you simply take a store purchased spoon or lure and dip it in Ultra Green Glow in the Dark Paint. You will need at least a 1/2 pint can for this to work. Then hang it to dry for 20 minutes. When dry, coat it with Krylon Crystal Clear Spray paint. Now go fishing and enjoy yourself.

Professional Glow in the Dark Spoons

Manufacturers use airbrushes and masking to paint spoons. Proper airbrush techniques can give you the ability to apply a smooth consistent surface with impressive fading effects. For tips on using an airbrush, consult our painting techniques section. Also remember to use a sealer.

Professional Glow in the Dark Lures

If you mold your own lures, you can add up to 10% of glow in the dark pigment (powder) directly to the medium before filling the mold. This makes a lure that glows from the inside and does not usually need a sealer.


Night Fishing with Glow in the Dark Paint

When I received my bottles of Ultra Green Glow paint, I was really excited to try it on my fishing gear. I wanted to see how much this stuff would make night fishing easier.

I am impressed. This stuff really works and now I'm going to tell you how to make your night fishing more productive.
The premixed glow paint can be brushed or sprayed. An airbrush is the best way to get an even coat of paint onto your tackle. But since most fishermen will not have access to an air brush, this article will cover brush painting. If you are lucky enough to have an airbrush, read the airbrush page on the Glow Inc. website.
The thicker you apply the paint, the brighter and more effective it will be. That being said, a light thin coat still does quite well.

Some of Glow Inc.’s products are waterproof and do not need an additional coat. Others like the Ultra Green I used for my testing require a clear sealer to protect them from moisture. I found that Krylon Crystal Clear spray paint as recommended by Glow Inc. is the best solution. It is readily available at any Wal-Mart or Home Depot for approximately $3. For fishing applications, I like to add 3 coats of this sealer.

One of the biggest problems with night fishing is seeing your rod tips. Even good lighting and brightly colored rods are a bit tough to see. The glow paint helps out here a lot. But, I just could not bring myself to paint the end of $200 fishing rods. A great solution is to use a coffee stirrer or drinking straw, depending on the diameter of your tip. You cut the straw to a length of about 2 inches and then cut a slit up one side. Paint the straw with a thick coat of glow paint and sealer. Then slip it onto your rod. In fact, I personally paint the straw after I have it on the rod because it looses some flexibility after a thick coat of paint.

This works very well to let you watch your tips. But you still have to directly watch them. I am lazy, which is what they say about all inventors. So, I developed a way to have the rod notify me when fish are biting. I went to the local craft store and bought tiny cowbells. Some have mentioned they like using the ones they sell for fishing, but I don’t prefer them. Paint your bells with your glow paint and sealer. Then attach them to the rod tip using a paper clip letting the bell hang loosely.

Many people fish with floats at night. Paint the top of your floats with a bit of Ultra Green and the sealer to make them visible.

When fishing at night or in deep stained water, you can use glow beads or glow lures to bring attention to your bait. Glow beads can be made from a 1/4” standard craft store beads painted with the glow paint. One or more of these beads can be threaded onto your line just above your hook. When painting the beads, we suggest that you string them on a line to keep the holes open.

I know they sell molded “glow beads”, but these are about 1/10 as bright as beads painted with the Ultra Green glow paint. A single glow bead in front of any lure or bait can really increase the number of fish caught at night.

Some have mentioned painting the glow weights. My experience is that the bead method allows you to get the “glow” closer to the hook. The glow paint is also much more durable on a bead than on a weight. Since the Ultra Green Glow paint puts out the same color as natural glowing deep water animals, it does not spook the fish in the least.

The final piece of advice I can offer is on charging your new glow items. You will want a bright light source or a UV light source onsite to keep your glow tackle not only glowing, but glowing brightly. An inexpensive way to accomplish this is with used disposable flash cameras, which can be acquired free from most photo developers. A better option is to buy a portable black light that runs on AA batteries. These are available from Spencer Gifts for approximately $15.

About the Author:
Rodney Long is a designer of innovative fishing products for several major brands. He owns the patents for dozens of products that are used in the fishing industry. His biggest successes include the “Boomerang Fishing Pro”, “The Long Shot Wiggle Rig”, “StandOUT Hooks”, “Mojo's Rock Hopper”, and “Rig Saver weights”. More information on his products can be found on his website at ezknot.com.


Review of Michigan Stinger's New Glow in the Dark Lures

As a photoluminescent chemist, I didn't realize the level of bio engineering that goes into designing fishing tackle. To say the least, I was surprised when I received a phone call from the engineer at Michigan Stinger requesting technical data. That call took place over two years ago. Since then, the Stinger engineers have performed over a hundred laboratory and real-life tests to design an efficient high end lure. As I write this review, their 2004 line of glow lures are being distributed to tackle shops around the world.

Fish think about food like a hungry teenager. If they see something that looks appetizing, they throw it in their mouth as fast as they can. Therefore, the biggest requirement of a great lure is that it can be seen from a distance. But the hard part is to design a lure that looks more appetizing than the local feeder fish. Any mom that has to prepare healthy meals to compete with junk food will fully understand the complexity.

There are about 10 companies currently manufacturing glow in the dark lures. The majority simply took existing lures and added a layer of the Ultra Green Glow Paint. While this definitely increases performance, there was a lot of room for improvement. Therefore, I will detail some of the technical aspects of the new Stinger line which sets them apart.

It is a fact that fish prefer their victims to have scales. For the last 20-30 years, it was thought that shiny, smooth lures had better performance. At the time, this was true. Shiny lures improved visibility at a distance when they reflected light from the surface. But photoluminescent pigment removes that benefit. Careful observation of fish shows that a smooth, shiny surface actually sometimes discouraged fish as they approached the lure. To address this, Stinger's engineers stamped tiny random hexagons into the metal of the lure. Although the lure now had scales, it was still a bit too shiny, so they added a texture to the paint to eliminate reflections.

The second major fact is that fish like to eat raw fish. In Japan, they call this sushi. The best sushi is colorful and as such is more attractive. Once again, fish go crazy over something bright from a distance. But as they approach, they want something that looks edible. While a 3-mile island glowing green fish looks like caviar when you are starving, it is not so appealing as a mid-day snack.

For many years, manufactures painted lures with a variety of contrasting colors in fish inspired shapes. No one has a doubt that this highly increases performance. But when it came to glow paint, that knowledge went out the window.

When they started mimicking the colors and designs of the regular lures with different colors of glow paint, they found it made a massive improvement. Tests showed that fish would lock their radar at a distance and kept approaching right through the attack.

As you can see, they made major technological improvements to something as basic and simple as a lure. They now had a lure that was visible at a distance and attractive as food at close range. But they decided to address another performance concern that they witnessed late in the process.

Photoluminescent paint is highly visible in moderate to low-light conditions. In moderate to bright conditions, this long range visibility does not exist without some help. They addressed this issue with fluorescent pigments, which convert UV light from the sun into a highly visible, almost neon light. This is bright enough to increase long-range visibility, yet it is not focused enough to discourage the predator.

Although it is an expensive proposition for any manufacturer, Stinger actually adds regular pigment, fluorescent pigment, and photoluminescent pigment to every color of their new line of glow lures.

To the regular human, these enhancements will not visibly be the most impressive. In fact, lures made by other manufacturers are much prettier. But to a fish, it is the difference between a greasy Chicken McNugget and a slow cooked basted turkey.

I commend Michigan Stinger for doing the research to produce a truly advanced product. If your favorite pass-time is sitting on a boat, relaxing, and drinking beer, than these high-end lures are not for you. On the other hand, if you like reelin' 'em in, then give technology a try.

You may consider glow lures the latest fad, but Michigan Stinger's long list of national fishing trophies backs their ability to do one thing ...... Catch Fish!

Michigan Stinger's Glow Lures are distributed by Advanced Tackle. You can visit their website at mistinger.com. If you don't know the difference between a mouse and a keyboard, you may be better off calling (800) 299-4353.
Written by Daniel Clark

Article source: notjustfishing.com


Grab The Bookmarketer For Your Site

Tuesday, November 8, 2011

How To Catch Catfish


Learning how to fish for catfish isn't hard, but it takes a little know how and luck. The first obstacle to tackle (no pun intended) is trying to figure out what type of catfish you want to fish for.

The most popular catfish to catch are channel, blue and flathead. Determining what type you want to catch will also help you determine you're fishing location.

Here in Missouri, you can catch just about any type of catfish you want. The most popular is the channel. Channels are the most popular because they're the most abundant.

They're the most abundant because they're found in most lakes, rivers, private ponds and even small creeks. Blue and flathead's are predominantly found in large rivers.

After figuring out what type of catfish you want to catch, you need to get the right equipment and the best catfish bait you can get your hands on. Personally, I never fish for cats with anything less than a heavy action pole, and heavy test line. They're aggressive fish, and will fight until completely exhausted.

You want to make sure you have the right equipment because you don't want a monster to break your line, or even worst, break your pole or reel. Another great catfishing tip is to either use a pole holder or hold your pole. You definitely want to anchor your poles down. I've literally had poles snatched from the bank by hungry monster cats, and it only took a split second.

Some people would also suggest that you can't learn how to fish for catfish without a cooler full of beer. The saying used to be, "if you don't catch fish, at least you'll catch a buzz." You must always remember to be safe and alert when fishing.

If you catch a monster catfish, you really should try eating it if you never have. They're great tasting fish, and the most common dressing method is skinning the catfish and either filleting or cutting the catfish into steaks. The catfish is a mild tasting fish, and can be fried, baked, smoked, poached or even pickled.

So now that you have the basics on how to fish for catfish, you just need to decide what type of catfish you're going to fish for. Personally, I love fishing for cats because it's one of the best ways to pass time. It's also a great way to spend time with the family, and you can pass on a tradition to your kids.

But be careful, catfishing can be like a drug -- addictive. In the beginning, you'll find yourself fishing whenever you can and thinking about catfishing -- every waking second. You might also find your checking account is a little smaller because you're spending money on poles, reels, and the latest stink bait to hit the market?

If you haven't tried your hand at catfishing, go ahead and try it. Like I said, "learning how to fish for catfish," isn't rocket science, but it does take some know how and a little luck.


Learn more about how to catch catfish http://uknowhowto.com


Grab The Bookmarketer For Your Site

Tuesday, November 1, 2011

Best Way To Clean A Trout


So you've caught dinner! Way to go! If you catch a trout under two feet in length, this is the best way to clean it that I've found. While the fish is still pretty fresh, take your knife (I use a sharp serrated pocket knife), and make a 45 degree cut from above the fish's head to behind the gills to the underside of the fish, but don't cut all the way through the backbone just yet. Next flip your fish over and repeat, but this time, proceed to break through the backbone of the fish while trying not to "cut" through the remaining guts. You just want to break the backbone.

Now while paying careful attention to what you're doing, pull off the head of the fish and most of the guts should come along with the head. Toss the fish head and guts on the lakeshore or river shore or else you may cause a disease in the fish that remain in the water because if they eat the guts from your fish, they could get sick (this is especially true in limited fish population areas). So now, take your knife and cut straight along the underside, starting at the anus of the fish and going towards the head of the fish (or at least where the head "used" to be). Clean out the rest of the guts.

At the top of the inside of the fish, you will see a white skin and underneath that is a ton of blood. I usually scrape that area with my knife and use my thumbnail and scrape backwards to get that skin off and start cleaning out all the blood. You have to do a really great job with the cleaning out all the blood, and at this point, get an old toothbrush and work deeply into the backbone area until there are no traces of blood at all. This is best done under running water with a fresh fish because as the fish dies, the blood thickens and makes it even harder to clean. Get all the blood cleaned out or else you'll have a nasty fish taste when you cook it up.

Finally, just wash (with your hand) the skin of the fish, getting it pretty clean, and get all of the extra innards out so you should be left with a perfectly clean fish, ready to freeze or cook up for dinner!

For great deals on beautiful classic cars, check out: Mike Calhoon MJC Classic Cars

and also check out: mjcclassiccars


Grab The Bookmarketer For Your Site